
Games
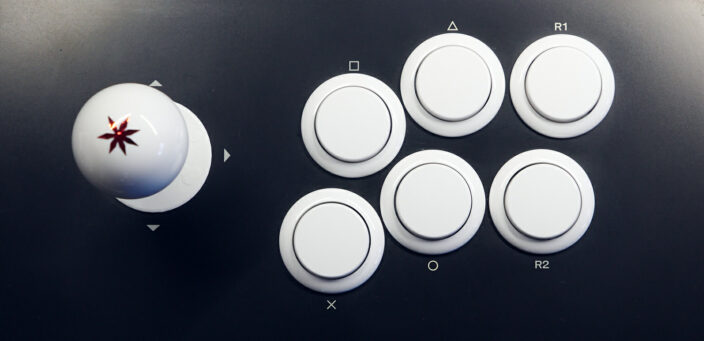
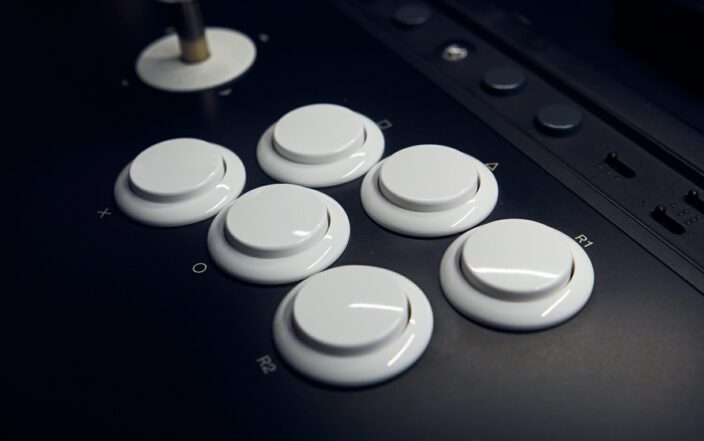
Seimitsu’s Alutimo Buttons
Special thanks to CQB Arcade for supplying the buttons for this review. They sell authentic arcade controls to Australia, and are hoopy froods. Check ’em out!
First up, I think the translation should be Ultimo, but Seimitsu used the more literal transliteration Alutimo, so that’s what they are.
Second up, these buttons feel fantastic. They’re just dreamy, the best I’ve ever used.
Third up, they are fiddly as f**k if you try to swap out the default switches.
And now, the long version.
For a while, I wasn’t sure why these buttons exist. It seems clear that Seimitsu thought it was a good idea at some point, but players were already awash with excellent button choices. What were they trying to achieve?
And then I installed them, and figured it out. These are buttons for players who need precision they can trust. It sounds like hyperbole.
They are incredibly well made, with smaller tolerances compared to their normal buttons. As a ready-to-use product, they’re wonderful. They cost twice as much as Seimitsu’s normal buttons, even the limited edition ones. And no wonder, along with this new precision comes a more complicated construction.
Once assembled, the Alutimo buttons are effectively the same three part button as all the rest: bucket, switch, cap, but made of nine parts instead of three. The complication is only an issue if you’re taking them apart; once assembled they’re rock solid.

In use, these buttons feel great. Better than great. These buttons feel polished, solid and smooth, like marble. A cool solidity that other buttons absolutely can’t match. They are very much a premium product, a joy to touch.
Every arcade button has different feel. Seimitsu’s Keikou buttons can grind a bit when you press the edges of the button at horizontal angles, where their Holo buttons don’t grind, but they can feel a little bit loose and rattley. Sanwa’s buttons can feel a bit sandy, not quite smooth in their descent. These Alutimo buttons have the most incredible, polished feel. They are a whole new class above the rest.
I am impressed and delighted, in equal measure. If you buy these as a ready-to-go button, you won’t be disappointed. The Cherry MX Speed switches are a perfect fit for these buttons. They’re laser precise.
It’s weird to describe a button with a word like crisp, but these feel crisp. They activate early, but not accidentally like Hori’s Hayabusa/Kuro buttons do. They feel solid, but not heavy like Sanwa’s microswitch buttons can. Maybe it’s wishful thinking, maybe it’s post-purchase rationalization, but these buttons make me feel better when I play. When I go back to other buttons, it takes a while to trust them again because I never noticed how cheap they feel.
Seimitsu wants you to believe that the precision will increase your chances of winning. I don’t buy it, but I’m not playing at a level where that sort of precision matters. But that said, it really feels good playing with top tier controls.
My next build will have them. They’re that good.
One of the main selling points for these buttons is the ability to swap the switches. If you don’t like the bundled Cherry MX Speed switches, you’re invited to replace them with the Cherry MX switch you do like. Raid your keyboard for different switches, and plonk ’em in your buttons.
But it must be said that plonk is doing some very heavy lifting here. There is nothing at all simple about the swtich swapping process. But a look at Seimitsu’s optional accessory list would make that clear before you even ordered the buttons. There are four different products available alongside the Alutimo buttons themselves.
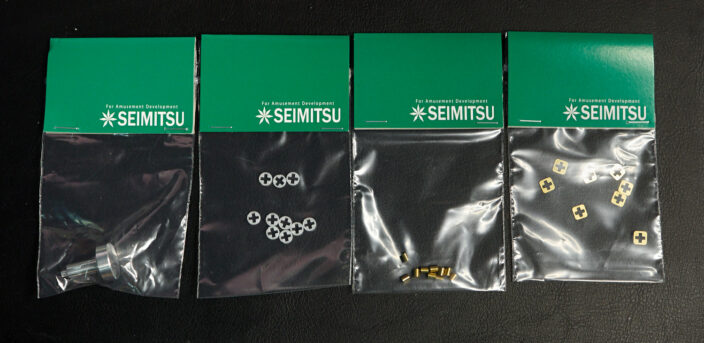
A special tool is required to eject the switch from the button, tiny brass rollers to replace the ones you shoot across the room during the switch removal, and two different shims, of different thicknesses, to help with the fact that there’s so much variance in the MX switches you install that you might need to make adjustments in steps of 0.2mm (that’s 5/7 hundredths of a quarter cubit, for American readers) in order to make the new switch actually work.
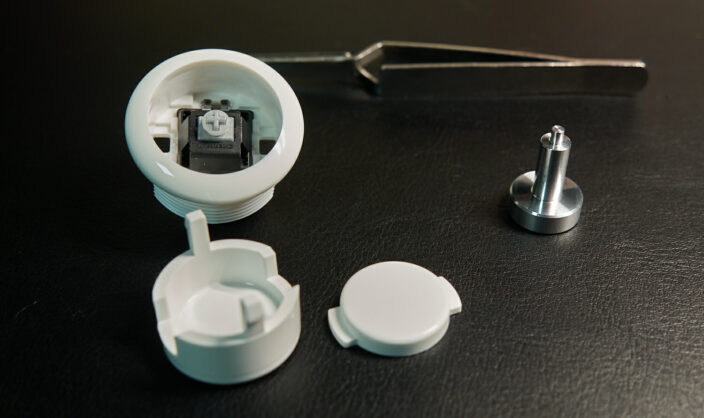
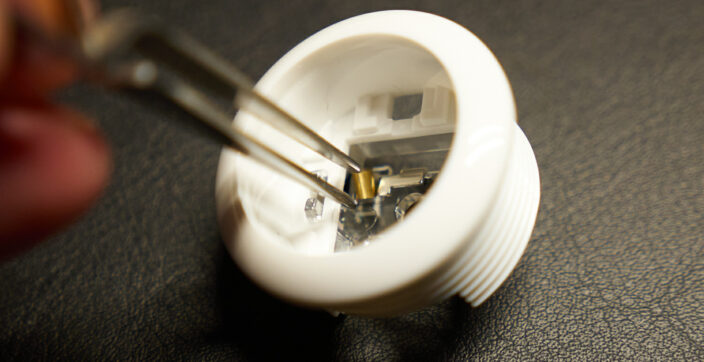
The button, with the special tool, and precision tweezers
I had to try it, for a thorough review, so the first thing I did was pull the button apart. Things are tight in this button, and it wasn’t by any means difficult but it wasn’t as breezy as the normal buttons. So I ejected the switch with the special tool, and immediately discovered the two brass rollers.
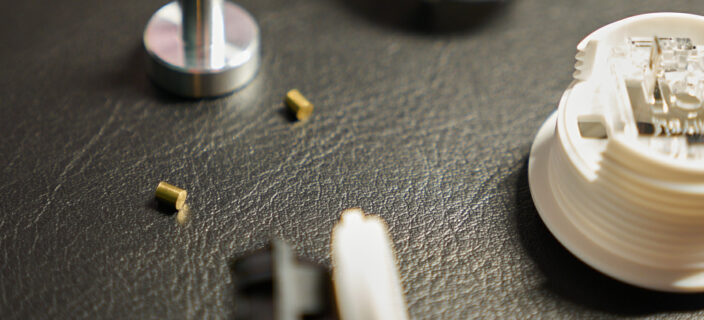
The button, with the teeny tiny brass rollers
And then I spent some time looking for them. They’re held in place by the switch, so when the switch is removed, they leap for freedom. In order to put the new switch in, you must first put the rollers back where they belong, and that is just not easy to do. Seimitsu says you should have tweezers for the job, and that is not suggestion so much as requirement.
Even using precision tweezers, I found it incredibly difficult to get them into position. If they weren’t falling out the hole in the switch cup, then they were falling into their sockets vertically instead of horizontally. I tell you, gentle reader, I started to despair after a few minutes of fiddling with the fiddly thing. You may replace ‘fiddle’ with another f word if you like.
Trying to replace the f-wording brass rollers. The word is fucking.
And then I discovered that the switches in my keyboard, an 8BitDo unit, uses Kailh Box hot swappable switches. They aren’t compatible with the Seimitsu buttons. While the cap fits the switch, the bottom of the switch has two posts to help align things during installation. There’s no hole in the Seimitsu button. Not all Kailh switches have these, so other versions may fit just fine.
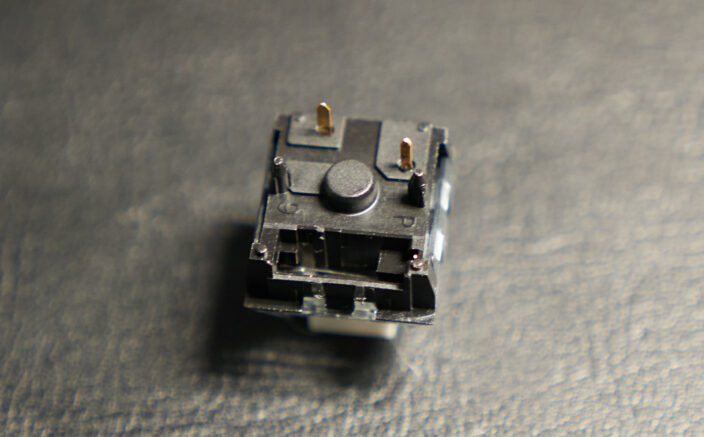
Two posts on the bottom of a Kailh Box switch
Seimitsu didn’t say they’d work, they only promise Cherry compatibility (with as many or few shims required to make them actually work). They do suggest other brands will work, at your own risk. But, the sort of person who’s going to tinker with the switch is exactly the sort of person who’s going to accept that risk with their tinker.
Just be sure to get the tool and some replacement brass rollers and two bags of shims if you plan to go this route. They’re not really optional.
--NFG
[ Jul 17 2024 ]
| Next Post | Navigation | Previous Post |
|---|
Comments
Name:
Email:
Website:


name
Oct 12 2024